-->

Sunday, November 27, 2022

Interior lighting of RIO Nord-Pas-de-Calais - part 7


In this post, I'm following up on the option #1 from my previous post. I decided to solder the different components and give it a try ...


Start with a failure


For the two white head lights

For the cabin light


At this stage, I ran a test and nothing worked. After quite some frustrations, nothing worked. It seems that I overheated the board and it is now permanently damaged. So, QUICK SOLDERING OR BURN THE BOARD!!


Try again with connectors

I then went with a new ESU light strip and decided to solder connectors that will allow for more flexibility in the testing:

Just connectors this time!

Left is for cabin light, right is for white head lights


The other side of the connectors are pins for a breadboard to make testing easy.


Recap on wiring

As mentioned in the ESU manual:

  • Optional front light: For operation in Control/Cab car, as shown in Fig. 5, a white front light can be added. Only white or yellow LEDs with a maximum current consumption of 15mA may be used. A series resistor is already installed. The front light works like the rear light, directionally.


  • External load (AUX1): To switch external loads (eg toilet lighting, destination signs, etc.) a separate transistor output with a maximum current of 100mA is available. It is shown in Fig. 6, and is preferably connected to the voltage + U. A series resistor for LEDs is not installed. The U + voltage is not buffered by the power pack and the control to adjust for brightness has no effect.


Testing

This is the fun part!


1. Red head lights (F0 forward) + Strip light (F2)


2. Red head lights (F0 forward) + Strip light (F2) + Cabin light (F1)


3. White head lights (F0 reverse) + Strip light (F2) 


The white head lights are the two white LEDs in row 40 on the breadboard.

It works well! Next step is to drill holes for the red LEDs ...


Saturday, November 26, 2022

Interior lighting of RIO Nord-Pas-de-Calais - part 6


Small progress today on the pilot car. I was able to remove the "cabin", but I had to break the light guide. This is okay because it was in the way of the red head lights anyway ...


Red/white head lights - option #1

The first option is to build the light module myself and wire the LEDs to the ESU light strip, as I alluded in my previous post. Looking at the light module from Miniature Passion, it might be an idea to solder the 4 LEDs on a bread board circuit. I would have to follow those dimensions:


Red/white head lights - option #2

Another option came when I realized that Jouef released new sets of RIB/RIO passenger cars. They are HJ4012, HJ4039, HJ4150, HJ4152, and HJ4154. When looking on YouTube, I found this video and it seems that the pilot car switches from white to red head lights:


From 2:05 to 2:26, you can see the lights switching. I then searched for the manual, and found that spare parts #6 is the lighting module. I found two websites for those modules:


I reached out to Lendon's Model Shop to see if they have the item in stock.


Friday, November 25, 2022

Interior lighting of RIO Nord-Pas-de-Calais - part 5


We now have to work on the pilot car. Besides the interior lighting, I would like to have the white and red head lights and maybe light in the cabin as well!


I was surprised to see that the pilot already has the white lights; granted it is a light bulb and not LEDs, but still, pretty nice for a model from that time.


The ESU light strip comes with red LEDs out-of-the-box controlled by F0. There are two other lights: 

  1. Optional front light: For operation in Control/Cab car, as shown in Fig. 5, a white front light can be added. Only white or yellow LEDs with a maximum current consumption of 15mA may be used. A series resistor is already installed. The front light works like the rear light, directionally.
  2. External load (AUX1): To switch external loads (eg toilet lighting, destination signs, etc.) a separate transistor output with a maximum current of 100mA is available. It is shown in Fig. 6, and is preferably connected to the voltage + U. A series resistor for LEDs is not installed. The U + voltage is not buffered by the power pack and the control to adjust for brightness has no effect.
This is explained in the notice for the ESU light strip: here. So, there's some testing here to be done to have both red/white head lights and the cabin's light.


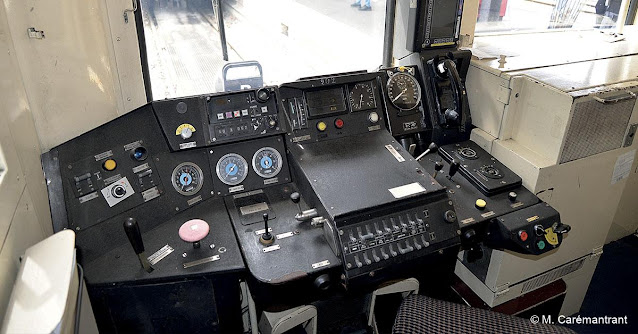
Cabin

I found the following pictures online:

https://commons.wikimedia.org/wiki/File:Rame_inox_de_banlieue_-_Cabine_de_conduite_01.jpg

https://commons.wikimedia.org/wiki/File:Cabine_RIO_M%C3%A9trolor.jpg

https://www.railpassion.fr/transports-urbains/fin-de-route-pour-les-rames-rib-rio-en-ile-de-france/

http://train-ho.over-blog.com/2015/12/rib-rame-inox-banlieue-livree-transilien.html


Sunday, November 20, 2022

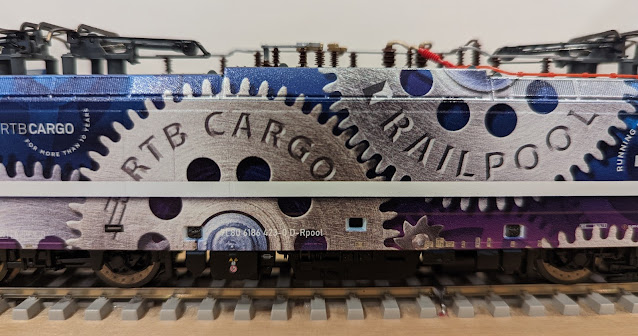
Traxx 186 423-0 RTB Cargo "Clockwork" - Piko 71188


This is a newly released model from Piko.


Prototypical engine

As usual, here are several pictures of the real locomotive:

https://www.flickr.com/photos/bjornnielsen/51381533287/

https://www.flickr.com/photos/maartenschoubben/51874125369/

https://www.flickr.com/photos/wouterdehaeck/51858806665/

https://www.flickr.com/photos/144300250@N03/50986399538/


Model locomotive


ECoS Command Station

Since it is a Piko decoder (manufacturer code 162), I can only adjust from the ECoS - or maybe also from JMRI, but I didn't try that. Instead, I set the DCC address in the ECoS:


I created the image myself and loaded it onto the ESU portal:


Sunday, November 13, 2022

Interior lighting of RIO Nord-Pas-de-Calais - part 4


The glue dried up overnight and we are ready for next steps: installing the lighting with its capacitor, and putting everything back together:


To program the decoder in the light strip, I simply reuse my existing ESU project. And now the video to show both cars with lighting:


Saturday, November 12, 2022

Interior lighting of RIO Nord-Pas-de-Calais - part 3


Needless to say that my previous attempt ended up to be disaster. Luckily, I found two bogies for the same Lima RIO car sets, so I just swapped the car from another set I have. Let's try again!


This time, I'm only pulling out the wheel on the isolated side to slide the spring.


Much better this time!


I should mention that I'm using a Back-to-Back tool from DDC Concepts to make sure the wheels are at the right gauge: https://www.dccconcepts.com/product-category/gauges-tools-and-fasteners/dccconcepts-gauges/


I test fitted the axles back into the bogie:


I can now do the wiring and give it a try on the test bench:


As you can see on the picture, I had to put some weight on the bogie to pick up power. Hopefully, the weight provided in the car itself will be enough!

Next step is to bring the two wires back into the car. I decided to glue the two wires on the side so they don't interfere with the rolling operation. It's just Tacky Glue, so it is a bit flexible and it should be easy to remove if needs be:


Meanwhile, I put some passengers in the car:


Not sure yet if the glue will be fully dry today. Stay tuned ...