-->
Showing posts with label rfid. Show all posts

Sunday, February 9, 2020

Ampoule LF RFID Tags

So, I was a bit underwhelmed with the previous tests with the ampoule HF tags and the Velleman readers. I, somehow, ended up on this website: https://www.locoduino.org/ and found many interesting Arduino projects for model railroad:

I am focusing on this last project, but the other two, and probably more on the website, are very comprising. The article mentions that the reader can be purchased at Sparkfun. After a bit of research, I ordered the following from that website:

Then, I realized that the SparkFun RFID Qwiic Kit needs a Redboard, which I bought at MicroCenter. But I actually needed to get a RedBoard Qwiic:

The Qwiic connector is needed to connect the board to the RFID reader. A Sparkfun RedBoard is in fact just another Arduino Uno, so I'll use the one from MicroCenter for some other Arduino projects.

In summary, here are all the components I got:

RFID Reader ID-12LA (125 kHz)
RFID Reader ID-20LA (125 kHz)
SparkFun RFID USB Reader
SparkFun RFID Qwiic Reader
SparkFun RedBoard
Programmed with Arduino
SparkFun RedBoard Qwiic


SparkFun RFID Starter Kit


Considering that I'm waiting for my SparkFun RedBoard Qwiic, I have to start with the USB Reader that does not need any board.  This is well explained in this documentation: https://learn.sparkfun.com/tutorials/sparkfun-rfid-starter-kit-hookup-guide


With the USB Reader, I just have to plug it directly to the computer and launch Arduino IDE. The port might need to be adjusted, but the serial monitor displays the necessary information. This was super easy.


One detail is that by default the module buzzes every time the reader reads a tag. I wanted to remove the buzzing as it is quite loud. As per the documentation, I was supposed to remove the soldering at the jumper, but I was not successful in doing that. I decided to desolder the buzzer itself.


RFID Reader ID-12LA
RFID Reader ID-20LA


Reading ranges


Here's a summary of the ranges for the ampoule RFID tags 850-0073-420-13F 20x4mm at 125kHz:

ReaderReading range
ID-12LA14 mm
ID-20LA16 mm


Ampoule RFID tags


The reading ranges are slightly better than the HF 13.56 MHz tags from RFID Inc., but the real advantage on these  LF 125 kHz tags is the size. Judge by yourself, but obviously, the LF tag is much much smaller, which means that it will be easier to fit into rolling models. The disadvantage is the cost: an HF tag is about $1.86 a piece, whereas a LF tag is $4.95.


Next steps


There are a couple of things to follow-up on:


1. Once I get the SparkFun RedBoard Qwiic, I will follow the documentation: https://learn.sparkfun.com/tutorials/sparkfun-qwiic-rfid-idxxla-hookup-guide. I expect it to be like an Arduino Uno, so my Python code should work in a very similar way

2. While reading at the ID-xxLA reader documentation, I decided to visit the manufacturer's website: http://id-innovations.com/httpdocs/Modules(non%20write).htm. Under my readers, there is the following note:
    Please kindly notice that Sparkfun USB adapter board/start kit/Qwiic kit gives less than 50% of the normal read range. If the reading range is critical for your application, please try DM-12LA Demo Kit
    I've reached out to the company to see where I could purchase the DM-12LA Demo Kit to have allegedly a 50% longer reading range:

    DM-12LA Demo Kit

    Stay tuned!

    Saturday, February 1, 2020

    Ampoule HF RFID Tags

    As mentioned in my first post about RFID, I ordered ampoule tags from RFID Inc.: https://www.rfidinc.com/hf-13-56-mhz-rfid-glass-ampoule-tags. After a couple of emails with the people at RFID Inc, the order has been adjusted to the following items:

    • Model HF-1575-312 Glass Ampoule RFID Tag, 12x3mm, ISO 15693 SLI memory chip SKU: 850-0073-312-04
    • Model HF-1575-420-13F Glass Ampoule RFID Tag, 20x4mm, ISO 15693 NFC memory chip SKU: 850-0073-420-13F
    Those ampoule tags are HF, so for a frequency of 13.56 MHz. The people at RFID Inc warmed me that those tags might not be able to work for my use case. So I decided to test the range of those tags with the two RFID readers from Velleman: VMA405 and VMA211.


    Velleman VMA405 & Ampoule 850-0073-312-04


    Well, this just does not work at all. I'm not clear as to why. I anticipated that the range will be minimal since it is the smaller tag, but even when putting the tag on the reader, I get nothing.


    So, not successful at all!

    Velleman VMA405 & Ampoule 850-0073-420-13F


    I get a good read on those larger tags and it is quite consistent. It seems that it works best when holding vertically:


    As we can see here, it works quite well:


    Velleman VMA211 & Ampoule 850-0073-420-13F


    So let's try again now with the VMA211 reader. The reason that I would need this one is that the antenna of the reader is a flat piece of circuit board that can easily be positioned under the tracks.
    Note that by default, the VMA211 is configured to use the onboard antenna and not the off-board one. This is well explained in the documentation. From the same document, there are a few things to install: https://www.velleman.eu/support/downloads/?code=VMA211

    • VMA211 Example
    • SPI
    • PN532 SPI
    The VMA211 is super easy to connect as it stacks directly onto the Arduino UNO.


    Conclusion & Next steps


    Here's a summary of the ranges for the ampoule RFID tags 850-0073-420-13F 20x4mm at 13.56MHz:

    Reader Reading range
    VMA405 10 mm
    VMA211 15 mm

    Saturday, January 25, 2020

    RFID & Airtable

    As mentioned in the previous post, one use case is to load a picture of the real engine from my online database when the model goes over the RFID reader. Here's the big plan:


    In this post, I am focusing on the link between the RFID reader and the Airtable link to display a picture. I'm therefore not looking at the ampoule tag and I'm not yet using the Raspberry Pi, but rather my desktop.


    Reading from the Arduino


    It's actually very easy to read the RFID tag from PyCharm on my desktop. Here's the code:

    import serial
    
    prefix = 'Card UID: '
    
    ser = serial.Serial('COM3', baudrate=9600, timeout=0.1)
    
    while 1:
        data = ser.readline().decode('ascii')
        if data.startswith(prefix):
            tag_id = data.replace(prefix, '').strip()
            print(tag_id)

    And the output is:

    C:\Tools\python37env\Scripts\python.exe C:/Users/Olivier/dev/workspace/airtable/test/test_arduino.py
    83 78 FF 20
    
    Process finished with exit code -1


    Airtable


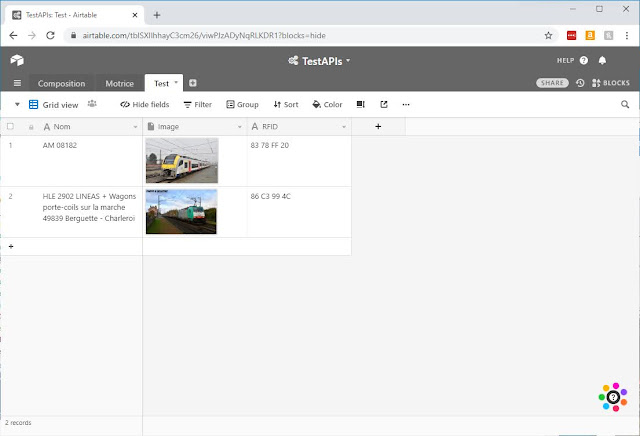
    Airtable is basically a smart spreadsheet in the cloud. For this test, I just want a simple table with a name, a picture, and a RFID tag. It looks like this:


    Airtable APIs are easy to use.

    import os
    from pprint import pprint
    from airtable import Airtable
    
    base_key = 'appC0WNPsCWPblK9H'
    table_name = 'Test'
    airtable = Airtable(base_key, table_name, api_key=os.environ['AT_API_KEY'])
    
    pages = airtable.search('RFID', '83 78 FF 20')
    
    for page in pages:
          pprint(page)

    And the output is:

    C:\Tools\python37env\Scripts\python.exe C:/Users/Olivier/dev/workspace/airtable/test/test_connection.py
    {'createdTime': '2020-01-31T01:37:03.000Z',
     'fields': {'Image': [{'filename': '25612dd9',
                           'id': 'attWjRFWBQNc8hR1M',
                           'size': 189794,
                           'thumbnails': {'full': {'height': 3000,
                                                   'url': 'https://dl.airtable.com/.attachmentThumbnails/1725a5c5e29346176b5952ad854700fb/edc60ca7',
                                                   'width': 3000},
                                          'large': {'height': 512,
                                                    'url': 'https://dl.airtable.com/.attachmentThumbnails/22420833e058b905df01446d39546abe/6146ffea',
                                                    'width': 785},
                                          'small': {'height': 36,
                                                    'url': 'https://dl.airtable.com/.attachmentThumbnails/b153b0d6c4f532ca2c53f3c6f9405dc0/38dd801d',
                                                    'width': 55}},
                           'type': 'image/jpeg',
                           'url': 'https://dl.airtable.com/.attachments/dd7cb8ee2ad8bf31e0926d7b4f882457/20e7d88d/25612dd9'}],
                'Nom': 'AM 08182',
                'RFID': '83 78 FF 20'},
     'id': 'recgQuOmkF3jJP8o0'}
    
    Process finished with exit code 0


    Putting everything together


    I can now link both codes into this one:

    import os
    import requests
    import serial
    from airtable import Airtable
    from pathlib import Path
    from pprint import pprint
    
    airtable_base_key = 'appC0WNPsCWPblK9H'
    airtable_table_name = 'Test'
    arduino_tag_prefix = 'Card UID: '
    path_local_cache = 'images/'
    use_local_cache = False
    
    
    def get_local_filename_from_tagid(tag):
        return path_local_cache + tag.replace(' ', '_') + '.jpg'
    
    
    def get_from_airtable(tag_id, file_name):
        pprint('Calling AirTable for {}'.format(tag_id))
        airtable = Airtable(airtable_base_key, airtable_table_name, api_key=os.environ['AT_API_KEY'])
        results = airtable.search('RFID', tag_id)
    
        if len(results) == 0:
            pprint('No results found for RFID Tag {}'.format(tag_id))
        else:
            if len(results) > 1:
                pprint('More than 1 result found for RFID Tag {}'.format(tag_id))
            url = results[0]['fields']['Image'][0]['url']
            f = open(file_name, 'wb')
            f.write(requests.get(url).content)
            f.close()
    
    
    def display(tag):
        # get local filename and check local cache if required
        filename = get_local_filename_from_tagid(tag)
    
        if use_local_cache:
            pprint('Looking in local cache for {}'.format(tag_id))
            local_file = Path(filename)
            if not local_file.is_file():
                get_from_airtable(tag, filename)
        else:
            get_from_airtable(tag, filename)
    
        os.system('start {}'.format(filename))
    
    
    ser = serial.Serial('COM3', baudrate=9600, timeout=0.1)
    while 1:
        data = ser.readline().decode('ascii')
        if data.startswith(arduino_tag_prefix):
            tag_id = data.replace(arduino_tag_prefix, '').strip()
            display(tag_id)

    And it is working as expected:


    Sunday, January 5, 2020

    Step 1 into RFID

    There are a couple of RFID systems available for railroad modeling:

    They both have pros and cons, but mostly they are a closed system and I probably won't be able to adjust those to exactly what I want.


    Use cases


    Here's a list of possible use cases for RFID on my layout:
    1. Identify an engine or a freight car for the correct entry in my database and the correct box
    2. Identify an engine as it goes on the layout
    3. Display an image of the real engine or real configuration from my online database
    4. Compute the speed at scale between two readers
    Therefore, there are a couple of steps to analyze:
    • Arduino
    • Arduino + RFID
    • RFID Tags
    • Raspberry Pi + Arduino

      Arduino


      I bought an Arduino starter kit a while back from Amazon: ELEGOO UNO Project Super Starter Kit 


      The documentation can be found here: Elegoo Super Starter Kit for UNO V1.0.2019.09.17.pdf


      Arduino + RFID


      I bought an RFID module for Arduino at MicroCenter: 


      The documentation can be found here: vma405_a4v03.pdf

      I just followed the diagram on page 4 and it works immediately. First, you launch the Arduino IDE:


      and open the serial monitor by clicking on the top-right on the IDE:


      As you bring an RFID tag near the antenna, the serial monitor will display the tag id:


      Now, in live mode:


      So, it seems pretty easy to have an RFID antenna reading RFID tags. But it would be great to have the antenna separate from the electronic module. This seems possible with the following module from Velleman: VMA211: SHIELD NFC / RFID POUR ARDUINO.


      https://www.velleman.eu/products/view/?id=450572

      The documentation can be found here: vma211_a4v01.pdf

      For reference, there is a blog here, but the documentation from Velleman was actually enough. Next steps, the tags!


      RFID Tags


      There is an article about the smallest tags available on the market: https://www.rfidjournal.com/blogs/experts/entry?11264, but I thought I would follow the products from Model Railroad Control Systems and look for ampoule tags.

      I found RFID Inc.: https://www.rfidinc.com/hf-13-56-mhz-rfid-glass-ampoule-tags. I have ordered two sets of tags for testing:
      • Model HF-1575-312 Glass Ampoule RFID Tag, 12x3mm, ISO 15693 SLI memory chip SKU: HF-1575-312-04
      • Model HF-1575-313 Glass Ampoule RFID Tag, 13x3mm, available with ISO 15693 or 14443 NFC memory chip SKU: HF-1575-313


      Raspberry Pi + Arduino


      Ultimately, we need a Raspberry Pi to call Airtable APIs. Therefore, we need to connect the Raspberry Pi to the Arduino. I found this article: https://maker.pro/raspberry-pi/tutorial/how-to-connect-and-interface-raspberry-pi-with-arduino