-->

Saturday, February 5, 2022

A better way to set a long address on a Roco engine


In a previous post, I described how to manually set a long address to a Roco engine that is equipped with a Zimo decoder. I found an easier way with DecoderPro from JMRI ...


The model


But first, let's have a look to the actual model. It's the reference 73880 and represents the BB 522307 from SNCF in its "En Voyage" livery.
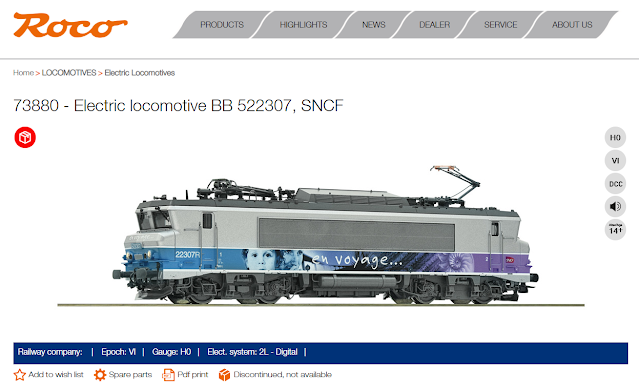

https://www.roco.cc/en/product/236491-73880-0-0-0-0-0-002002-1/products.html


Some pictures of my model:


And the links to all the manuals:
  • Functions on the decoder - link
  • Sounds on the decoder - link
  • Operating manual - link
  • Spare parts - link


The decoder & JMRI


I installed DecoderPro from JMRI a while back, but never really got to it. I launched it because I'm curious on how to properly program a Zimo decoder. While I didn't go into the full configuration, I found that setting a long address was actually quite easy. 

Here are the steps:

  • Launch DecoderPro and click "New Loco":

  • In the new window, click "Read type from decoder":

  • The software automatically detects the type of decoder and pre-selects the possible options. I was not sure which one it was so I chose the one that seemed to be the generic one "MX645 version 37+":
  • In the new window, it's very easy to provide a long address and click "Write":


The ECoS


Now switching to the ECoS, it shows the correct address; so much easier than the previous method:


Sadly, I'm not certain the decoder supports RailCom because there are no icons, so I need to do this manually which is a bit tedious. I used another BB 22200 from Roco to adjust the engine profile:


And voilà!


Saturday, January 22, 2022

Digitization of a I11 pilot car from LS Models - part 2


So, this is part 2. Part 1 was a bit of a disaster … But anyway, I got the fx decoder and I'm now ready to go.


Digital

In this type of situations, a function decoder is enough since no motor needs to be controlled. I purchased the following decoder:

  • ESU 59219 - LokPilot V5 Fx DCC/MM/SX, 21MTC NEM660 - link


And surprise, this time, it fits perfectly!


Let's do a quick test in both directions:


LS Models does not provide much details about what the function decoder can control. The usual F0 function controls the head lights depending on the driving direction. That will be enough for me since I'm going to use an ESU lighting kit that includes its own decoder:


Interior lighting

I'm using the ESU lighting strip that has its own decoder; this is ESU 50708. LS Models mentions on the manual where to solder the wires for lighting, but they would be controlled by the function decoder. I decided to solder the wires directly where the power comes from the wheel pickup:

The 2 brown wires are for the lighting strip

And it works!


The lighting strip fits perfectly on the ceiling of the passenger car. I positioned it with double face tape:


And now, it is time for some passengers:


ECoS Command Station

So now the passenger car has two decoders: one for the headlights and one for the interior lighting. You can refer to this post about how to use the ESU lighting kit, but the short version is that I will be using F2 here. So, I need to set the same address to each decoder - I chose #1101. The F0 will mean something only to the function decoder, whereas F2 only to the lighting decoder. Problem solved!


Final result

Here's how it goes inside:


And we obviously need a video:


Monday, January 17, 2022

Van Biervliet AM86


I'm the happy owner of a AM86 from Van Biervliet. This is the real thing:


https://www.flickr.com/photos/47704640@N02/49979764787/


And here's the model I purchased: Van Biervliet VB-4003-07 DCC Sound with interior lighting:


And a short video:


Wednesday, January 12, 2022

Digitization of a I11 pilot car from LS Models - part 1


I purchased a set of 3 passenger cars type I11 of the SNCB from LS Models with reference 43047. It's a great set as it contains the pilot car.


The pilot car can receive a decoder to control the lights. This is what I want to do, as well as adding interior lighting with figurines.


Opening the I11 pilot car


The instructions (fig 3) only indicate to take the sides of the body from the back and then lift it towards the front of the car.


It didn't come apart as easily. I used my usual method of sliding fine plastic pieces, starting around the bogies:


I ended up putting many plastic cards:


I eventually managed to open the car, but I made some small damages:

I will have to glue back those footboards

I'm not quite sure how critical those are


I will make a video on how to properly open this type of car, but certainly DO NOT slide the plastic cards across the entire body as I'm sure this is how I broke those tiny blue strings of plastic.


Digitizing the I11 pilot car


The instructions (fig 4) for the decoder are quite simple. 

1- Remove the connector to the body:


2- Remove the support of the head light module:


3- Remove the dummy decoder and put the DCC one. I took a ESU LokPilot 54615:


And voilà! It does not fit at all ... 🤦
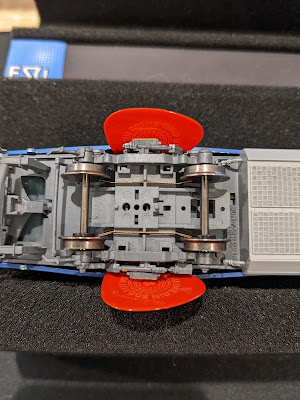


As it turns out, ESU has decoders specifically for this type of use. They are function decoders, meaning that they cannot control a motor, but are designed to control lighting. There is a suite of such decoders: LokPilot 5 Fx


 I've just ordered a couple of those. So, there will be a part 2 on this subject. Stay tuned!


Sunday, January 9, 2022

Digitization of the BB 27156 Lineas


This is the exact same as the recent previous post; but since I really like those engines, you'll get two videos 😁


Together on the ECoS:


Friday, January 7, 2022

Closed for winter


https://www.flickr.com/photos/beyondtrains/25876352020/


Sunday, January 2, 2022

Digitization of the BB 27134M Lineas


I largely followed a previous post about the digitization of a BB 27000 from Mehano. The main difference here is that I'm working from a blank decoder. 


The model

This BB 27134M Lineas is a model from Rails Models Creation based on a Fret BB 427000 from Mehano. The livery is specific to Lineas and the buffer sections have been modified with spare parts from Os.Kar.


Here's the prototypical engine for reference:

https://www.flickr.com/photos/jobiwannn/37553559132/


The decoder

I chose a blank decoder from ESU - ESU 58420 LokSound V5 DCC, 8-Pin, Sound Decoder


The sound project

The ESU website hosts numerous sound projects for ESU decoders. They are organized by decoder version, regions, and manufacturer or personal project.


I downloaded this project: S0294-LS5H0M4-Elok-SNCF-BB27000-V1-R1.esux


The LokProgrammer

From there, it is a matter of writing this project into the blank decoder. You can double click on the file (*.esux) and it will open in the LokProgrammer software:


We can check that sounds are available:


The functions are nicely mapped already:


We can adjust the information as needed:


We can now adjust the digital address and write the data with the sound. I only need to use that one button:


Writing sound data will take some time:


And the final result


This worked very smoothly; see below: